Pages

Wednesday, June 25, 2014

the projects that took way more time than it should have

This post is about two projects that we thought could be whipped up over a weekend.

Spoiler alert: They took almost a month.

It starts back on Memorial Weekend, when we were visiting our friends in Minneapolis. Mike's sister sent us a picture of an outdoor bench going for $5 at an estate sale. Did we want it? Heck yeah! We envisioned using it as part of our landscaping.


It's a lovely teak bench that just needed some cleaning up and paint to pop (it really blends with the brick). So, we decided to paint it. We also wanted to refinish the patio table that the previous owners left behind. Seemed like simple projects.

For the table, we decided to use our Kilz Primer and our leftover trim paint, since it'll be in the covered patio. The bench would specifically get outdoor paint, since it'll get full exposure to the elements. Off we went to the hardware store, blissfully skipping because we knew our DIY dreams were about to come true.

...

See, there's a funny thing about painting outdoors. You don't just have your schedule to contend with, you have the H word. Humidity. I'd like to take a moment and apologize to everyone around us, because I think this stormy June is our fault. It pretty much started the moment we set out to paint the table and bench. Our bad. Anyway, you need to be careful about humidity levels when you paint, because the moisture in the air will cause the ingredients to evaporate at different rates, which can cause bubbling and other woes.

We decided to paint the bench rails green and the wood white. With a can of Rustoleum and a humidity check (look on the can for workable levels, then check the weather report), I set to work.


This was definitely the easiest part of the process and took a few coats.


The next step was painting the wood. I enjoy painting, but this quickly became tedious due to working around the iron rails and in-between the boards. We used Rustoleum's Painter's Touch Ultra Cover (not spray), since it's supposed to handle outdoor conditions. This is where we started running into humidity and schedule issues. The first night, I just painted the wide flat spots, then had to wait a couple of nights before I could get into the tiny areas with my tiny brush, because of Humidity. And torrential thunderstorms. The VOC rating in the paint was above the low level and the can specifically said to use outdoors or in a fresh-air, well-ventilated. Considering we were hitting the 90s in between nasty storms, we weren't going to open the windows and paint inside. Plus, that would let in the humidity and defeat the whole bloody point.

BUT. We could do that with the table.


 See, we took the leftover green paint from the bench rails and sprayed the flat sides of the table top.


By the way, even if you're outside, I recommend using a ventilator while spraying. Right after this shot I grabbed ours, because the fumes were nasty and I like my lungs and brain cells.

Once the spraying portion was done, we cleared space in the dining room and brought the table inside, since we'd be using low VOC primer and paint.

Yep, that's the bench hanging out with one coat on. We brought it in during the storms, since it was still curing.

I do wonder what any snooping neighbors must think, since all they must see is chaos through our windows. The table painting, at least, was a 3-night project with priming and two coats of paint. We probably could've done it within 36 hours on a weekend, but this was a week night project.


The roller made things go on fast and smooth.


The hardest part was getting the table through doorways.


Now it's complete!

Tonight, now that our Humidity was back to a workable level, I set up a work space in the patio. Laptop, bluetooth speakers, Netflix, and some ginger ale is all I need. Is that asking for much?

Check out our new swing and pad!

Things went much faster this time. I'll still need to do another coat (and hope the weather cooperates), but I think this will give you a good idea of the finished piece! It'll look nice against the brick out front.


Sunday, June 8, 2014

fabric, furniture, and frustration

So, we’re going to do some time traveling, because I haven’t been the most diligent when it comes to posting In Real Time. This won’t exactly be a montage, but feel free to crank on some 80s power music.


In early May, we bought a reading chair for the library. It was an arduous, multi-day task because style and comfort were at war with one another. It was down to this comfy swivel/rocker chair and a comfortable but more stylish armchair. We were leaning toward the armchair, though I had some issues letting go of the fun rocker. But when we went back for the armchair, it was gone. Turns out it was a discontinued item. But wait! They could special order it! It was Berkshire weekend, where they like to make you think you're wheeling and dealing, but let's be honest, folks. Mr. Buffett didn't get rich by being a softy (however, I have to say the Buffett full-ride scholarship is awesome!).

The favored chair on the left, comfy rockin' Charisma on the right.


But we needed to Pick Out the Fabric. This deserves capitalization, because it’s a Big Deal. And the price of the chair changes with the fabric, so while the sales manager went to get us pricing all on the different tiers, we went through the swatch books. Our lack of confidence in fabric translated into lack of confidence in the chair. It was gone, so we couldn’t sit in it again for a good comparison.


So, out to the sales floor we went to look at Charisma’s awesome swivel rocker chair that totally wasn’t the look we envisioned, but once you sit in it, you go to a happy place. So then we started grabbing fabrics for this one. Mike kept leaning toward solids with texture, whereas I was wanting to find a fun pattern to inspire our direction in the library. 


As we wrung our hands and dithered, a living room set next to us was getting lots of traffic. The fabric looked sophisticated, a shiny weave of black, silver, and a subtle red brown up close, and we liked the legs (something Mike always focuses on with furniture). When a group cleared out, we sat down and found the set to be comfy. It also had an armchair; wider than the one that got away and a little bit more expensive, but it was also by a better brand.


Yep, we wound up buying it and in the display fabric. We envisioned draping a red throw over it for the pop of color we’d been going for (but couldn’t seem to settle on). A week later it arrived and we brought it home.


It looks good in the corner, though it also seems to emphasize our lack of decoration in here. It’s comfortable to read in as well, but it’s lacking a foot rest (we weren’t about to pay $200 for its companion ottoman!). So, we decided we’d find one on Craigslist and reupholster it with something fun and splashy.


On a cold, drizzly weeknight, Mike spotted an old school ottoman on Craigslist and negotiated down to $30. At 9 p.m., we threw our jackets on and went out to pick it up. Mike was pretty darned excited with the find, though it was quite apparent it needed a makeover. 


With the antique legs, we think it would be fun to paint them and pair with a modern geometric print.


We got it home and presented it to the chair. It was a little tall. That’s okay, we could always remove some of the foam.


A couple days later, I set to destroying the ottoman. I cut into the fabric and then ripped it off in chunks. But the fabric was super stapled all the way around, so this became war.


You might think that removing the industrial staples instead of ripping at the fabric would be easier. It’s not. I have the wounds to prove it. Some of the staples were already popping out, so I went for that low hanging fruit with a flathead screwdriver. Sometimes they popped out nicely, other times … not so much. The staple would split and I’d have two poky ends to contend with. Usually I could wiggle those out with pliers, and when that failed, I’d squish them flat.


Some of the staples were so embedded that there was just no way they’d come out without damaging the wood. With my fingers, scissors, and the flathead, I tried pulling, wiggling, begging the entrapped threads to come out. After some stab wounds in my hand, I finally realized that eyebrow tweezers might have better luck.


And they worked beautifully. It was still tedious work, but that’s what Netflix is for. Finally, I had enough of the old crud cleared out to prime. First, I rubbed the legs down with TSP to clear off dust and grime. Then, I sprayed it with Zinsser’s Cover Stain.

Be careful not to “linger” in your spray movements, or you’ll get thick spots like I did when my brain apparently wandered off. I grabbed a towel, hoping to wipe it off right away and respray, but I just made a goopy spot that needs some light sanding. It seems that sometimes the primer went on very smoothly, and other times (probably depending on the angle), it looked good but was gritty to the touch. So we sanded a few areas smooth.


Now that we were primed, we needed to paint. But in order to choose a paint color, we needed our fabric.


Bum-bum-buuuuuum!


We are in year 3 of our marriage and picking out fabrics/decorations is definitely a test. If we found a fabric that we both liked, it didn’t remotely mesh with the fun “modern meets antique” idea, because it would either emphasis the filigree details or just blend in with the room. And we wanted POP! Or, we liked the pattern, but the fabric wasn’t right for upholstery, or it was blue, and Mike wants to make sure we don’t become “the blue house” (I have blue tendencies). There was a fun, blue sailboat fabric we both liked and initially decided against because we didn’t want to be kitschy, but after multiple trips to fabric stores, it was starting to appeal.


We did take some fabric swatches home but wound up saying no to them. Btw, it’s really hard to pick fabric out of little two-inch swatches. At this point, I was looking at fun curtains at Target and considering buying a panel to turn into the cushion and pillow. We also were searching online for fabric because, man, it’s expensive in stores! But we were wary of judging the quality through a photo.


Then we decided that maybe we should just go for the blue sailboats. Worst case scenario? We get tired of it in a few months and have to reupholster. It won’t be fun, but it’s not the apocalypse or anything.


So, I went back to the store … and it was gone.


Weirdly enough, there was an orange-red version in the closeout section. It was discounted 70%, so around $3.50/yard. I said what the heck and grabbed 4 yards, figuring if it didn’t look good with the ottoman, we’ll use it for something else. It’s just a fun fabric!

Primed legs, folded fabric

It's not remotely what we originally had in mind, but we dig it's fun and funkiness. You'll just have to wait to see the finished product! Hopefully this week. =)

Monday, June 2, 2014

keepin' it classy with curbside freebies

The prevalence (nay, tyrannical dominance) of beige in this city is one of my big pet peeves. The other? Thursday garage sales. By the time Saturday rolls around, the Thursday and Friday people have picked them over. This goes for estate sales, too. Why must you do this, garage sale people?!

So, Thursday coming home, I see a sign in our neighborhood’s entrance for a garage sale. Usually everyone’s closed up shop well before 4 p.m., but on a lark, I turned where the sign pointed. Then I didn’t see another sign at any of the cul-de-sac entrances and gave up and went home. About 15-20 minutes later, I get a text from Mike.

The thumb is for authenticity

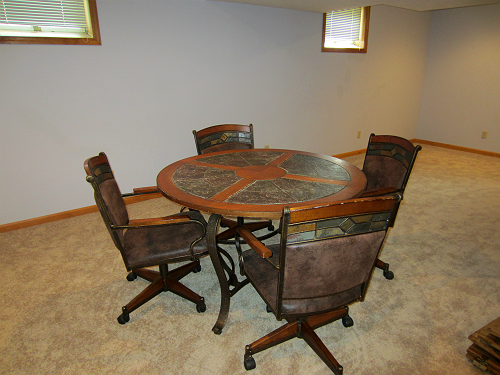
Free! Do we want?

Um, yes? Even though we didn’t have a specific need, they were free and looked cool, so why not? Of course, that logic could lead us down a dangerous path of free-stuff hoarding.

Apparently the moving sale folks had decided it was worth more just to get rid of the set than try to sell it. But no one was home, so Mike wanted me to get the trailer unfolded and the plywood strapped on as far as I could before he got the few blocks home. Who knew how long this would last? Our saving grace would be it was on a cul-de-sac and the signage blended into the street pole.

I had the car turned and the trailer rolled out, so Mike just had to help me unfold. We’ve gotten pretty good at getting this thing down and strapped quick. We rattled off the down the street (the neighbors must be used to this by now) and the set was still there!

It’s a heavy, solid set. As we loaded the trailer, neighbors were coming home and giving us some weird looks. Hey, free sign. Someone's gotta reuse it. For Mother Nature and all.

We managed to strap things down fairly well, though if we’d been traveling beyond a few blocks, we would’ve used several more. Everything held together fine until we were backing up the driveway and a buckle came loose, so we had a chair dangling toward the edge.


Since we still needed to get the boats out of the patio and we didn’t feel like wrestling these down the stairwell, we went into avoidance mode and left the set on the trailer. But then come Saturday morning, we had to face reality, because we needed that trailer to go sailing on Sunday.

The chairs went downstairs easily, but the table was another matter. It’s heavy and a wee bit wide for the basement doorway. It barely fit through the garage door. We wheeled it across the kitchen and quickly realized that we were going to destroy some things (and ourselves) if we tried to wheel or carry it down.

Mike inspected the table and realized the top would screw off. So that’s what we did. MUCH better and no gouges in the wall or ourselves. So now our curbside freebie is hanging out in the basement with our barstools that no longer have a high island to sit at. The basement feels like the Land of Abandoned Furniture right now.

Hmm ...