Pages

Showing posts with label Mike. Show all posts

Thursday, June 25, 2015

Demo, baby! A Mike post

No our Poppyseed is not demoing...yet. Instead I found my ‘nesting’ instincts revolve more around a sledge. As we previewed before, I decided that when wifey is away I should ‘check’ to see how difficult the tile would be to replace in the second floor bathroom.  

“It’s pretty much ridiculous. I think you could set off a nuclear bomb in here and be fine.”  

Yep, we knew this house has good bones, but sometimes they REALLY overbuilt. Case in point, our bathroom tile is individually, hand-placed ceramic tile, over 1 WHOLE INCH of wire-reinforced concrete.

With the help of a shiny new prybar and an arsenal of tools, I went at it. After five hours of demo, only ⅓ was completed...Boo. This stuff was insane to demo and was remarkably well made. The chief cause of frustration was that wire mesh. It looks like chicken-wire, but I assure you, that it's at least 2-3 times as thick. The traditional technique of breaking up the tile and then lifting it off the floor in large sections just didn't work because of that wire mesh. Instead, the mesh meant that I had to resort to a tedious technique.

First, break up the ceramic tile and leave the cement exposed. Next, using a shiny new pry bar, lift up a foot of concrete at a time from the sub-floor. This will then proceed to drag all of the rest of the floor with it because of that darn wire mesh. Then pry up around the target area a few more times, which loosened the cement from the floor.  And now for the really un-fun part, take the 4 lb sledge and break out the concrete pieces from each hole of the wire mesh. This took FOREVER to do.  


Once you have a mound of rubble, scoop it all up and haul it to the garage. Rinse and repeat.

Now, after that first foray, I was about as sore as you can imagine. We also had a gazillion family/friend activities and weddings to attend, so that poor bathroom sat ⅓ demolished for longer than I care to admit.  Sorry, Emily!


Before the next demo party, it was time to take out the toilet. Of course nothing is ever easy, and the shutoff valve needed to be replaced. Back to Lowes!  This time I was smart and picked up shut-off valves for all of the remaining toilets in the house. If two were bad, then we can be assured that other ones should be replaced, too.  

Anyhoo, once the water was shut-off, we inexpertly drained the tank, managing to splash a fair amount of the tank water on the floor, OOPS.  

Hint, this is epic foreshadowing for our next post….

Anyways, I removed the toilet tank, and then proceeded to try and remove the bowl.  Nothing is ever easy.The original installers had saved 10 whole cents and used zinc plated bolts instead of the nominally more expensive brass. The problem with zinc?  It eventually corrodes and our house is 30 years old. We now faced a completely rusted-out bolt and nut that needed to be hack-sawed off. Double grumble.
 
Image result for hacksaw corroded toilet boltImage result for hacksaw corroded toilet bolt

Eventually we removed the bowl and cleaned up the toilet flange. Learning from the many other DIY bloggers, we stuffed an old rag down the waste pipe.This stops any sewer gasses from drifting back into the house and also prevents any debris from getting in the stack.  
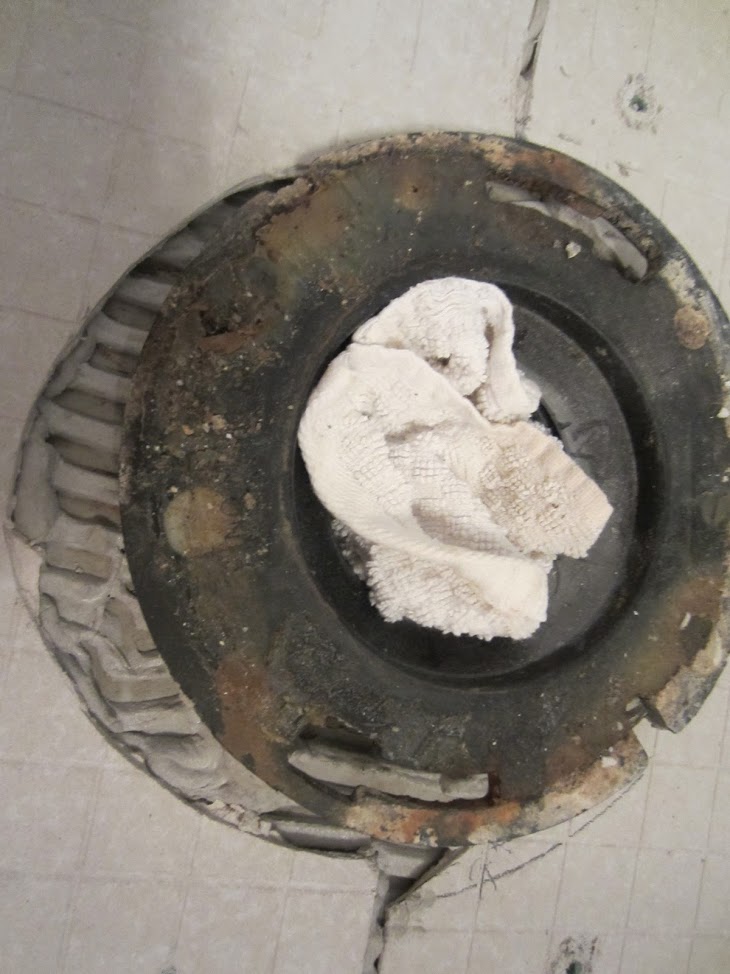

I then SLOWLY proceeded to demo the rest of the bathroom. All said and done this ‘little’ bathroom managed to suck up a solid week and a half just for demo. The subfloor is in fantastic shape for a 30 year old home. The only real worry is this spot next to the tub.  
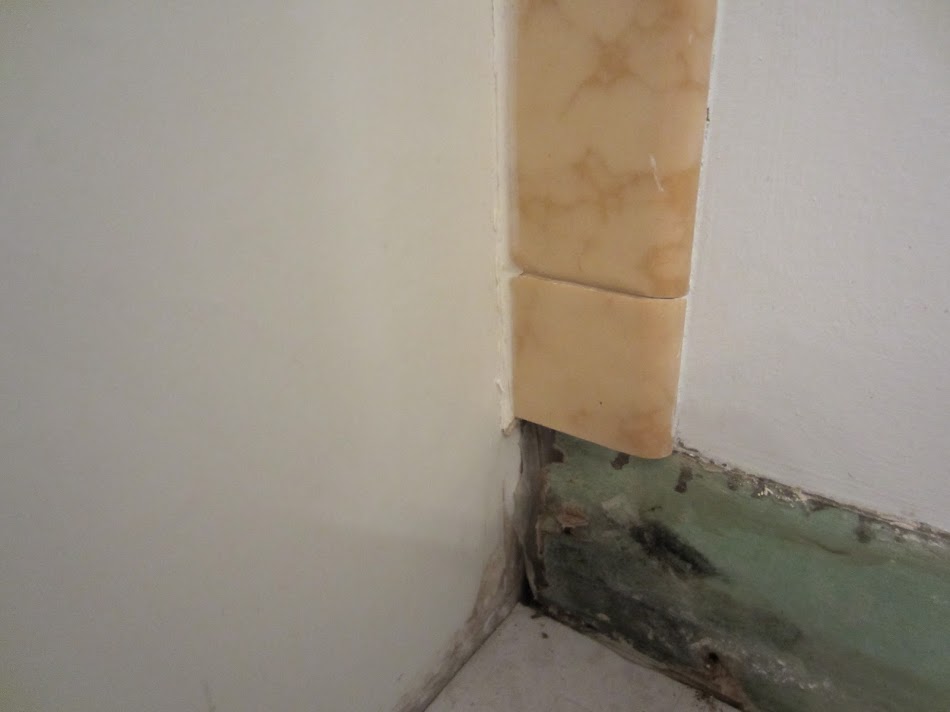

While there are signs of surface rot, we tested it and the area is still sound. We are going to seal it up and the new thinset should protect things nicely for another 30 years.

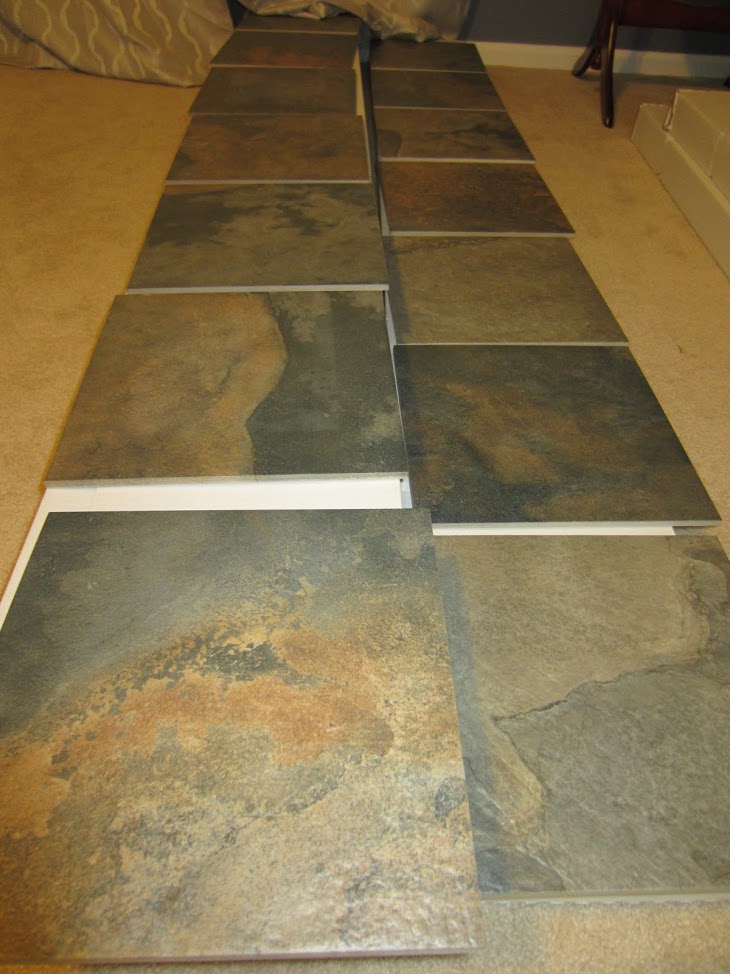
So what's next? Here is a preview of the tile that we purchased from our awesome haul.  Depending on how dark it looks overall, we might paint the vanity. Then, I’ll need to put down thinset and cement board to level out the floor. Finally, we’ll get to install the tile.

Tuesday, February 18, 2014

How wrong it went…and saved by a bucket

Mike writes:

Emily and I have been on a grand adventure the last three weekends trying to find bath hardware for our master bedroom. We had the rather mistaken belief that bath hardware should cost us only $2 per item ... maybe $10 for the big pieces. Oh, how wrong we were!


Anyways, I, the hunter of this illustrious pairing, finally found bath hardware at Target of all places. Great price and heavier and better or same quality than the Moen sets we saw at the big-box hardware stores; purchased!

With a beautiful day off and Emily at work, it was time to start installing all of these pieces. But first came Mexican breakfast.

The plan was to install the 18”, 24”, towel hooks and the toilet roll holder before noon. HA HA HA HA


The install of the hook took all of 15 minutes as I was able to reuse the existing holes. The 18” took another 15 minutes as I had to drill out and remount some drywall screws. Again, piece of cake. My dreams of a luxurious day off of doing absolutely nothing were right there in my grasp.


Then came the 20” bar. Brackets went on lickity split. No issues whatsoever, until I had to add in the connecting bar. Low and behold, the darn thing was off by not more then 1/16th of an inch. 1/16th of an inch to close together means the bar will NOT fit into the brackets. After 20 minutes of finagling and loosening and retightening, everything lined up and it looked great. 


And then came the toilet holder. Arguably the easiest and simplest bath piece to put in. Two brackets and a squishy bar meant I could be off by more than ½” and everything would come together just fine. First step, remove the old holder. It popped right off and all that remained was the little bracket. I grabbed my trusty drill and started to unscrew it from the wall. Wait for it….

Along with a dremel and vise grips, I tried for more than an hour trying to get two stupid screws unscrewed from the wall. No luck, and then this happened…


I’ll admit I finally got so frustrated that I took a hammer and ‘gently’ pulled the screws from the wall by force. It turns out that the drywall anchors that the former owners used managed to catastrophically fail.  As you can see they fused themselves to the screw. They were not coming off with out cutting the heads off with a hacksaw, or pulling them through the drywall.


I was also left with a colossal sized hole in my drywall. Something that the wifey didn’t need to know about if I could possibly avoid it.


It was time to troop down to the basement workshop and see how I could possibly save myself. It's also time to talk about being saved by a bucket.

Now, I've got a childhood friend that has every tool that you could possibly imagine. I also had a grandpa that loved auctions. This has manifested in myself a deep down desire to buy good quality used tools at auctions whenever possible. The wife slightly condones this. It has also led me to be a firm believer in a special bucket that all good homeowners should have. I call this the “Screwed Bucket." Every time you go to an estate sale or to an auction, you will run across a small coffee can of assorted screws, nails and what-not.  Buy it. Seriously, it will be the best two-dollars you will ever spend in your life. This is my bucket; isn’t it wonderful? 


See my ‘Screwed Bucket’ has grown as the number of auctions and estate sales I’ve been to has increased.  There is a plethora of random and accumulated awesomeness inside of this bucket. It has also saved my bacon more times than I can count. Often times, when you get yourself into a situation that is pretty much guaranteed to cause your better half to raise an eyebrow, you aren’t quite sure what you might need.  This where the bucket comes into play; dump out half of that glorious collection of random saviours and search through.  Cool, look at this stuff:
No clue what to use those for, but they are going to be amazing when I need them. Anyways, buried within that pile were two alligator drywall anchors and assorted sizes of bolts. Eureaka, thank you bucket!

Back upstairs the anchors and bracket screwed together perfectly and it was..F..I..N..A..L..L..Y time to attach the bracket. You know where this is going… The large chunk of drywall was just big enough, ahem, that the bracket managed to recess itself into the drywall just enough to cause the bracket to fall off. Seriously, after being saved by the Bucket, I’m still looking at an expensive and laborious drywall patch…

Now, I’m not a big proponent of divine intervention, but sometimes the man upstairs does stop chuckling at the adventures of Mike and Emily enough to really send down some lightning. Boom, not more than 3 minutes later, a GENIUS idea occurs to me. “Mike, wouldn’t it be great if that drywall protruded from the wall a bit? Yeah, duh. Hmm what if we fashioned ourselves a bracket for the bracket so that the bracket would be secured.  Whoa Genius!"  So with a nod to the man upstairs, tt was time to wander down to the basement and fashion myself a small piece of wood that would slip under the bracket. Voila:


30 seconds later we had this glorious situation on our hands:


So, if you are ever in a situation that has you fearful of the better-half's raised eyebrow, trust in your handy bucket and the man upstairs.