Pages

Sunday, August 9, 2015

tiling like a boss

Well, we finally did it! WE TILED THE UPSTAIRS BATHROOM!

::big belly dancing::

It’s funny, originally we figured it would be years before we began updates on this bathroom. The tile was ugly but in good shape, and it’d be the kids’ bathroom. Getting the carpet out of the master bathroom should have been priority #1. But but, but, we found pretty sweet tile for only 88-cents!  It's a Deal!

You know what?

We wish we’d done it sooner! (Except we would’ve missed out on the killer deal.) It’s just like the kitchen pulls -- we dragged our heels on it, but once it was done, it was sooo worth it!

Okay, enough gushing here. Last you heard from us, Mike had cut and laid the Hardi board to give us a level floor for mortaring the tile. Next came the tricky part - figuring out our “main tile line” that would become our guide for the entire layout. Or, squaring the room for you technical folk. This proved more difficult than we expected.

centering.png
Making a line
First, just to see, we laid a line of no-cut tile from the tub to the wall  behind the toilet (call this the horizontal tile layout) and squared it up, marking the square on the board to keep us in line. We ended up with a small gap that was too big to hide with the trim, and too small to easily cut a sliver of tile.

Hmm, ok. So the easy peasy full square, half square, full square starting brick pattern wasn’t going to work. I grabbed some cardboard and cut out “templates” for ⅓ and ⅔ tiles, so we could play around with cuts without actually cutting anything. This allowed us to get a good idea on how to negate that sliver of tile on the toilet wall.  

Next, we had to contend with positioning around the toilet stack. Basically, what obstacles would we have to worry about in the ‘vertical tile layout’ direction?  Originally, our starting line was against the back wall, but this would mean 4 circular cuts around the stack. So, we shifted the starting line a half tile from the wall, which allowed Mike to make two half-circle cuts instead of four quarter-circle cuts.

laying.png
Testing
Now we were in business.

Looking back, we are so glad we took time on this step.  It really set us up for success throughout the whole tile job.  A lesson learned for future tile jobs is to certainly do this step but not to the exacting standards that we had done for our first tile job.  A word from the newly wise, layout the tile as best you can, but don’t stress completely about being perfectly exact.

Next, we opened up multiple boxes of tile and spread them out. We love the variations in each tile, but this means we need to be careful with laying things out. You don’t want clusters of similar tile in one area of the room. We even laid out the tiles that would need to be cut in half, notched out for corners, etc.  

layout.png
Dry layout with labels
Once we had our pattern, Mike had a brilliant idea: LABEL THEM!

Since they’ll get moved around as we start to mortar, it’d be easy to get the order mixed up. So, Mike grabbed some painters tape and numbered each one and included an arrow for the upper right corner. This was the best idea ever! We could safely move and reorient things as we needed to get the best design possible.  Likewise, this immensely helped during ‘cutting day’ as Mike could simply mark and grab the right tile.  Then we moved tiles to the hallway so that they were out of the way.  

Mike marked the final starting line all the way down the room before clearing that space for mortar. Our game plan was to lay down all the non-cut tile first on a weeknight and then do the cuts on the weekend, since this involved going up and down a lot of stairs (tile cutter was stationed in the patio).

After a considerable amount of internet sleuthing around, Mike still had questions about which mortar to use.  Luckily, our good friends are builders here in town.  Mike went over and looked at the bags of mortar that they were using for their gorgeous tile job in the master.  He wrote down the bag numbers, grabbed them from the store and GAME ON!

While Mike was on trowel duty, I was the official Hander of Things. So, I’d hand him tile, spacers, wet rags, etc., as needed. (Mike says “this saved gobs of time and stress, thank you wifey!”) I’m just glad I wasn’t the one on my knees and messing with the mud. The tile was stacked in numbered order in the hallway, so I could just grab and hand to Mike.  Then, he would trowel on a couple of tiles worth of mortar and begin laying them down.  The first row is CRITICAL, as it essentially determines your entire layout of the floor.  Mike checked each tile to make sure that it aligned perfectly with its neighbors and also that the tile was level.

Rince and repeat.  This was the easy part...

mortrar.png
Laying the mortar
Next came the hard(er) part, cutting and laying all of the half and notched tile.  

Cutting Day!!! Mike read about several different ways to cut and shape tile.  The most effective for our tile was the tile saw and a good pair of compound nippers.  Mike tried the manual ‘score and snap’ tile cutter, but it wasn't a good fit for this tile.

snap.png
Just before the SNAP
The ‘score and snap’ is a pretty ingenious method of cutting SMOOTH tile.  You simply score the tile with the carbide wheel, push down on the handle, and the pressure from the handle pushes tile against a small triangular ridge on the base. The tile should then ‘snap’ along your scored  line.  While our tile is hard wearing porcelain tile, it’s actually roughly textured to resemble slate. The carbide cutter wasn't able to make a consistent line across the tile, and often times the tile would shatter.  

Luckily, we scored on a ‘cheap’ tile saw from Amazon a couple years back. This thing is nothing special but it certainly got the job done.  Mike set up a tiling station on the back patio and went to town. Mike says that it was surprisingly easy to cut the tile and was likely the lowest stress part of this whole project.  He didn't even really use a measuring tape to mark his lines.  Instead, he would line up the tile with the tile spacers and adjacent tile. He would then use a second tile overlaid to trace out the vertical and horizontal cut as needed.  A little later, he found an even better method by ‘connecting the dots’.  

template.png
Mike making his dots
In this method, you simply line up the tile that needs to be cut, and make a ‘dot’ with a sharpie on the edge of the tile.  At the cutting station, it was easy to use a speed square to create the needed line on top of the tile.  

The curved cuts were next, and were not nearly as difficult as expected.  Again, slow and steady won this race.  Mike made a series of ¼ - ½ inch vertical cuts into the circular cutout.  Then he would use a hammer to sharply strike near the edge of the circle, most times the tile would break close to the desired circular line. To clean everything up, Mike used a set of compound tile nippers (make sure you spend extra and get compound nippers, the regular nippers are not powerful enough for porcelain/ceramic tile) to clean up any jaggged edges.  

corners.png
Some of the fun cuts (and our seriously beat up trim)
With the tile all down, it was time to grout. We didn’t want white and we didn’t want something too dark, since it’s not a large bathroom and the tile is already dark. We wound up selecting DeLorean Gray, and it’s a great light-to-medium gray.

Unfortunately, I was no longer just a Hander of Things. Since we had to be cognizant of drying time, I was put on sponge duty. Mike would lay the grout, and then, after about 15 minutes, I followed behind him with two large buckets of water and two sponges. I was not looking forward to this, because wiping up the shower grout was the worst part of grouting the master shower.

hander.png
8 months pregnant, handing things, cleaning things

This time, things went better, either because of our grout choice or a better technique.
  1. Squeeze the sponge out in clean water.
  2. Swipe it across the tile (diagonal if you’re going across tile corners).
  3. Flip the sponge over and swipe again.
  4. Rinse the sponge in the bucket.
  5. Repeat.

We had the two large buckets of water, because your water gets dirty pretty fast, and dirty water doesn’t rinse well. The two-bucket method saved us some trips up and down the stairs and out of the house.

wiping.png
Mike wiping
This is also the phase of tiling when we discovered another disadvantage of textured tile: grout gets in all those grooves and ridges, and you really need to scrub them out. Scrubbing was slowing me down and I was running into dryer and dryer grout. Once Mike was done grouting, he followed behind me to spot check grout left behind. Then, a couple hours after we started, we were done! I checked in about an hour later, and the tile had barely glazed over in a couple areas, so I wiped it again. We had a gorgeous and rock-solid new floor for the bathroom. Plus a HEAP of new knowledge on tiling that we’ll use on other parts of the house.

tile done.png


Next up? Painting!

Thursday, June 25, 2015

Demo, baby! A Mike post

No our Poppyseed is not demoing...yet. Instead I found my ‘nesting’ instincts revolve more around a sledge. As we previewed before, I decided that when wifey is away I should ‘check’ to see how difficult the tile would be to replace in the second floor bathroom.  

“It’s pretty much ridiculous. I think you could set off a nuclear bomb in here and be fine.”  

Yep, we knew this house has good bones, but sometimes they REALLY overbuilt. Case in point, our bathroom tile is individually, hand-placed ceramic tile, over 1 WHOLE INCH of wire-reinforced concrete.

With the help of a shiny new prybar and an arsenal of tools, I went at it. After five hours of demo, only ⅓ was completed...Boo. This stuff was insane to demo and was remarkably well made. The chief cause of frustration was that wire mesh. It looks like chicken-wire, but I assure you, that it's at least 2-3 times as thick. The traditional technique of breaking up the tile and then lifting it off the floor in large sections just didn't work because of that wire mesh. Instead, the mesh meant that I had to resort to a tedious technique.

First, break up the ceramic tile and leave the cement exposed. Next, using a shiny new pry bar, lift up a foot of concrete at a time from the sub-floor. This will then proceed to drag all of the rest of the floor with it because of that darn wire mesh. Then pry up around the target area a few more times, which loosened the cement from the floor.  And now for the really un-fun part, take the 4 lb sledge and break out the concrete pieces from each hole of the wire mesh. This took FOREVER to do.  


Once you have a mound of rubble, scoop it all up and haul it to the garage. Rinse and repeat.

Now, after that first foray, I was about as sore as you can imagine. We also had a gazillion family/friend activities and weddings to attend, so that poor bathroom sat ⅓ demolished for longer than I care to admit.  Sorry, Emily!


Before the next demo party, it was time to take out the toilet. Of course nothing is ever easy, and the shutoff valve needed to be replaced. Back to Lowes!  This time I was smart and picked up shut-off valves for all of the remaining toilets in the house. If two were bad, then we can be assured that other ones should be replaced, too.  

Anyhoo, once the water was shut-off, we inexpertly drained the tank, managing to splash a fair amount of the tank water on the floor, OOPS.  

Hint, this is epic foreshadowing for our next post….

Anyways, I removed the toilet tank, and then proceeded to try and remove the bowl.  Nothing is ever easy.The original installers had saved 10 whole cents and used zinc plated bolts instead of the nominally more expensive brass. The problem with zinc?  It eventually corrodes and our house is 30 years old. We now faced a completely rusted-out bolt and nut that needed to be hack-sawed off. Double grumble.
 
Image result for hacksaw corroded toilet boltImage result for hacksaw corroded toilet bolt

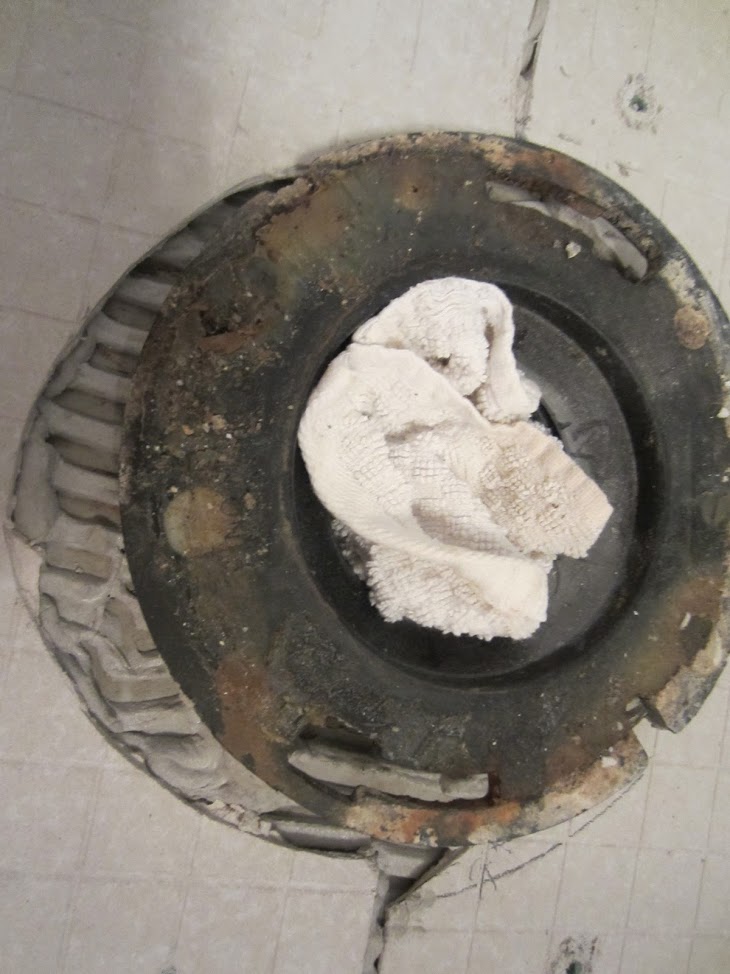
Eventually we removed the bowl and cleaned up the toilet flange. Learning from the many other DIY bloggers, we stuffed an old rag down the waste pipe.This stops any sewer gasses from drifting back into the house and also prevents any debris from getting in the stack.  


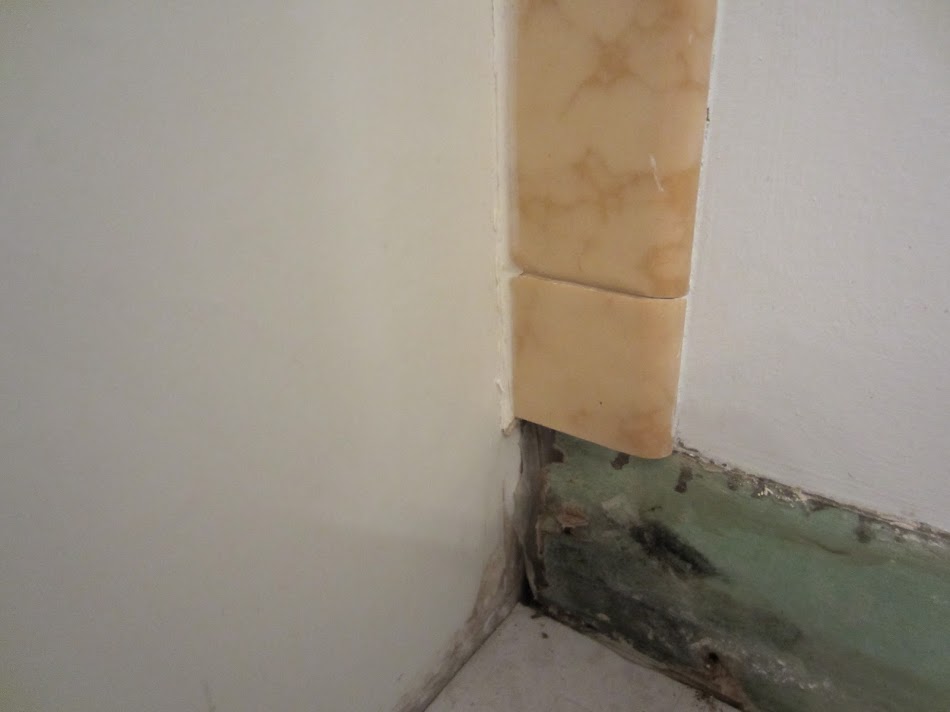
I then SLOWLY proceeded to demo the rest of the bathroom. All said and done this ‘little’ bathroom managed to suck up a solid week and a half just for demo. The subfloor is in fantastic shape for a 30 year old home. The only real worry is this spot next to the tub.  


While there are signs of surface rot, we tested it and the area is still sound. We are going to seal it up and the new thinset should protect things nicely for another 30 years.

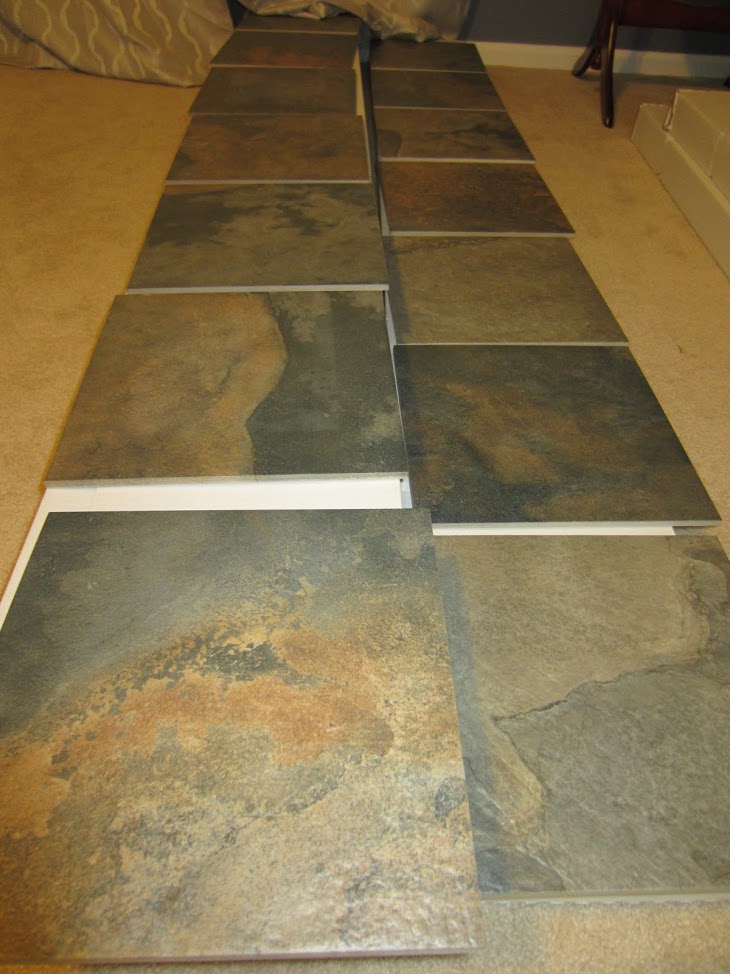
So what's next? Here is a preview of the tile that we purchased from our awesome haul.  Depending on how dark it looks overall, we might paint the vanity. Then, I’ll need to put down thinset and cement board to level out the floor. Finally, we’ll get to install the tile.


Friday, June 19, 2015

Nursery progress + Pinterest fun

Now that the third trimester is upon us (OMG!), it’s about time we update y’all on the nursery progress. Like our little Poppyseed, it’s also a work in progress.

Back when we contemplated a Poppyseed, I ventured into the world of nurseries and all things cuteness on Pinterest. And it just got worse once the little one “arrived” as two lines on a stick. Even though all a baby really needs is a safe place to sleep, Pinterest and blogs out there will have you believe that an Awesome Nursery of Awesomeness is the first test of good parenting.

So, yes, I have multiple boards full of nursery ideas, and I might even tackle some of them. Within reason. Our “theme”? Um, sailing+nerd? Seriously, there’s adorable nautical stuff out there, but there’s just as equally awesome Star Wars & Harry Potter ideas that I think “Geek” might be the all encompassing theme.

Our backdrop is gray (Mindful Gray by Sherwin Williams) and navy/white, because of this cuteness:

Scored at Home Goods

Plus, navy will carry in the sailing aesthetic introduced by our next practical acquisition:

sailboats_zps3cyoetdk.PNG
Marshall's

If you’re like my very excited mother-in-law, you might say, “Oh, you’re having a boy!” Well, we don’t know what we’re having, and I firmly believe navy (or blue) is a gender neutral color. And the amount of girl and boy sailor clothes I’ve seen in stores this season fully support me on that! I figure once Poppyseed is out, we can add in whatever accent color we want. Personally, I’m leaning toward teal, but I could see red to make those sails pop.

At the end of this post, you can check out of my favorite nursery ideas. But for now, let’s see where we are, shall we?

First, Mike primed and painted the trim. DO THIS BEFORE THE WALLS, it makes life so much easier. You only need to tape or cover the carpet and quickly brush the trim.

nursery before_zps9jl9sxrc.PNG

Then, we had to paint over the peach with Mindful Gray. This was our first time ordering a color without prior sampling. Lowe’s discontinued our go-to Valspar Ultra, so we figured it was a good time to try out Sherwin Williams’ zero-VOC line called Harmony. I did a lot of Internet hunting for a reliable neutral gray, and Mindful Gray kept popping up. It was more a matter of expediency than confidence that I bought a gallon without first testing it.

Luckily, we love the color! In daylight, it’s a slightly warm gray, and it does take on a little more brown in the evening. We think it’ll be a perfect backdrop for whatever colors get incorporated. We got lucky!

main shot_zps3seb0mjm.PNG

Our feelings on Harmony, on the other hand, aren’t as enthusiastic. Despite being advertised as zero-VOC, it still has a strong odor. I wore a mask, just to be safe and ward off headaches. The texture going on was definitely smoother and less prone to gunking up than Valspar, probably due to the slower drying time. The coverage? Pretty much the same as our Ultra; it nearly gets it all in the first coat, but you definitely need that second coat. At twice the price (even with a coupon), we did hope SW would prove to be superior and were disappointed. To rub salt in the wound, we knew we didn’t have quite enough left in the bucket for a full second coat. No worries, we’d just grab a quart and mix it in.

Wrong.

Apparently, SW only carries Harmony in the gallon size. I was rather upset about this, because what we needed was maybe half a quart. I almost walked out. Painting a small bedroom shouldn’t cost you $80 post coupons! Then I toyed with the idea of ordering a sample, except the sample comes in a higher gloss and different line, so I didn’t think that would be wise. So, I sucked it up and bought a gallon. I’m sure we’ll be repainting at some point, once the little one discovers crayons and markers …

Anyway, with the walls freshly painted, it was time to assemble the crib. We’ve heard tales of nightmare crib building but didn’t think it could be that difficult. And it wasn’t, for the most part, except the included instructions were barebones and the pieces weren’t labeled. The instructions had labeled pieces … but apparently Sticker Guy took a break when our crib came down the assembly line. After some choice words for Sticker Guy, Mike figured it out, and then I held pieces together while he screwed them all together. Fascinating stuff, right?

crib_zpspm2syoi2.PNG

Next, Mike’s parents graciously gave us one of their gliders. It’s super comfy and free! We’ve been struggling in our glider/rocker hunt, because we didn’t want to be spending a few hundred dollars on something that will only be used for a couple of years. I even contemplated foregoing a glider for the sake of our budget, but with so many moms telling me it’s a lifesaver during all those nights of breastfeeding … let’s just say I’m very grateful to my in-laws!

changing table_zpsujyegbfo.PNG

Next, we hauled up an Ikea expedit shelf from the library to use as changing table and storage until we find a dresser. We’ll throw a changing pad on top and baskets into the cubes. We also scored a neat bamboo toy box at a garage sale (see crib pic). Mike’s considering restaining it, just to bring the grain out a bit more. It’s not complete yet, but it’s definitely taking shape, and I do get a little mushy hormonal when I go in here now.

What we still need to do:
  • Hang room darkening curtains
  • Caulk the trim
  • Get mattress and sheets
  • Hang/create/acquire decor (see ideas below)
  • Get baby supplies
  • Have a baby!

So, without hopefully being too crazy and random, I’d like to highlight some of my favorite nursery ideas. Heck, I might even complete some before the baby’s born.

Wall Decor
Love this Star Wars/Seuss combo, and who wouldn’t love Darth Vader with a Death Star balloon?
swseuss.png

Heck, it’s even coordinated with this No Wake Zone collection!
nowake.png

Or, alternatively, this text-less silhouette collection.

sailsil.png

But let’s not forget about Harry Potter! I admit it, I’m a sucker for book page art. Unoriginal? Sure. Doesn’t make it any less awesome.

hppages.png

Love this little girl walking her AT-AT.

atat.png

Nautical shelves! Be easy and cute to do.

shelf.png

And I love this driftwood sailboat garland. Maybe I’ll make a mobile like this?

sailgarland.png

Random Items
An R2-D2 diaper pail is a must.

r2d2.png

Also love the idea of a Lego toybox, or even a robot one. Here you go, Mike!
toybox.png

Stay tuned ...

Friday, June 5, 2015

Fantastic dresser makeover!

This is our first guest post on House of M & Em, and it’s a great debut from our good friend Stacy! She did a fantastic job on refurbishing a dresser into a kitchen island. Check it out!
Last year, I went with my Mom to an “Idea House” show at a local garden center. Every year they repaint and redesign the entire how to showcase different ideas, interior designs, flowers and plants. What caught my eye that year was an old dresser that had been turned into a kitchen island/storage space in the small kitchen area.
My own kitchen, while actually fairly spacious, has no countertop space at all. Gorgeous built in cabinets, yes, countertops, no. I had been using an old table left behind by the previous tenants, but hunching over a low table to chop vegetables is a terrible idea for your back.
A year went by and the idea just kept percolating in my brain. Finally, after some prompting from a friend, she found a cheap fixer upper dresser on Craigslist. I e-mailed right away and got it!
It was in a little girl’s room. While a nice and sturdy wood, it had been painted with a heavy, glossy exterior paint. Besides the white and purple you see here, one side was pink and the other a pale yellow.
I started off the project by attempting to just sand down the paint. That didn’t go well. The paint was so thick and tough, I went through a lot of sand paper and even with the power sander, it didn’t go well. A quick trip to Home Depot and I was prepared with paint stripper.
There are actually a few different options for paint stripper. Spray can stuff, water-based stuff, a paste you paint on with a brush, a liquid you spray on with a bottle. I went with the liquid you spray on with a bottle, thinking it would be easier to apply that way. If I had to do it over again, I’d go straight to the paint on kind. The bottle just sprayed in patches I had to smooth out anyway and took forever. But, boy did it work!
             

A short 15 minutes after it was applied, the paint started bubbling up. Then it was easily scraped off, leaving behind a clay-like residue.
            
After repeating this with all the drawers, dresser sides and top, I then went back and cleaned off the residue with the accompanying cleaner. I took special care to get the top cleaned off nicely as I intended to keep the natural wood top look.
I knew going into this project, I didn’t want a sharp, clean or modern look for the piece. It wouldn’t look right with the dresser and it wouldn’t fit with the old house with its original, built-in wood cabinets and 1920s sink. Instead, I wanted it to look lightly distressed, a little old and worn, but nice.
I quickly learned making something look artificially old is more work than a clean, sharp coat of paint. But it was worth it.
I started by applying 2 coats of Antique Artichoke semi-gloss paint to everything except the top of the dresser.
 
After the second coat of paint finished drying, I applied beeswax to the corners and other areas where I wanted the green paint to show through.
I then painted the dresser a soft, warm white color. Two coats of paint.
     
For the drawers, I originally wanted to just whitewash them so more of the green showed through. It’s easy enough to do by adding water to the white paint. I then made a strong batch of coffee to brush over the dry, white paint to give it a nice, aged look.
  
The site I saw that recommended using coffee to age it said to leave it on for 20 minutes before wiping off the extra. I don’t know if my coffee was too strong, if I put too much on or what, but 20 minutes was too long for me. It left hard, puddle outlines and too dark in spots. So I ended up only leaving it on for a few minutes to dry before using a paper towel to wipe it down.
After doing that, I changed my mind and decided I didn’t like the whitewashed drawers. I liked the green too much and wanted more of it. So, I painted the drawers green again.
Now to distress the piece. Using some sandpaper, I sanded down corners, edges, places where it would look nice and make sense for the piece to wear down. This let the green peek through. The beeswax I had applied earlier to these spots let the paint come off more easily without really scuffing up or over sanding any of the areas. I also sanded the drawers, allowing a little of the whitewash to show.
       
For the top of the dresser, I sanded it, applied one coat of a natural color wood stain and then three coats of a matte finish poly to protect the top.
Then it was just a matter of finding new hardware to replace the knobs and pull and my project was complete! A custom kitchen cart adding storage and counter space. No more sore back while prepping food!


Monday, May 25, 2015

a BIG present

The little one is sucking up all my taskmaster juice, so once again, we are going into the past on this post. Mainly, April. With a splash of May.

Back in April, I turned 30, and relearned that Mike is quite the schemer when it comes to gift giving. Apparently this present had been in the works for years, crossed state borders, and come up against several almost got its! He usually builds up anticipation for the gift by dropping puzzling clues that I never seem to get right. This one he simply said would not be arriving on my birthday and that he might be in trouble.

Hmm …

So, on the night of my birthday, I ask to know what’s coming my way and why he might be in trouble. “Where’s your iPad?” he asks.

I pick it up, look at him, and wait.

“Check your email.” I pull it up, wait for the app to sync up, and there’s a new email from Mike titled: Card catalog.

The word might not mean much anymore. But librarians (and hipsters) it means SQUEE!

Saturday, May 2, 2015

our current state of affairs

Mike took a Monday off a couple weeks ago. And sent me a picture much like this.


Then the next day I got a cold. A couple days later, he got a cold.


Also, there's a good, solid inch of concrete and industrial wire under this tile. Which meant Mike had to go buy another tool. He was pretty giddy about it.


Colds are now mostly gone. Hope to have an update soon!